SharePoint : How to filter an external data XsltListViewWebPart in SharePoint Designer ?

sharepoint 2013
sharepoint 2013

Context : You use Business Data Connectivity to retrieve external data in SharePoint, and you wish to display a filtered view of this data in a page.
In SharePoint Designer, you insert a Data View of that external data.
Then, there are 2 ways to filter it :

  • By using the « Filter » button in the office ribbon :
SharePoint Designer Filter

This actually generates a CAML query :
SharePoint_BDC_Filter_External_Data_2

  • By passing a parameter to the finder method of the BDC Model. You can do this manually or by using the « Search » button :

SharePoint_BDC_Filter_External_Data_1b
It generates this code in the View element :
SharePoint_BDC_Filter_External_Data_3
You should use the second solution. Why ? We could consider the CAML query as a « front-end » filter. It means that ALL the records are sent by the BDC, and then the CAML query filter it.
If you retrive thousands of records, it can affect performances.
If you pass a parameter directly to the BDC (finder method), the request sent to the external source will be filtered, and SharePoint will have to deal with less data.
Maybe you will have to create a new finder method in your BDC, but it worth the time spent on it !

Azure : Faire cohabiter du PHP et du .NET sur un même site, c'est possible !

azure_logo Dans Azure, le cloud de Microsoft, il est possible de faire héberger un site web qui contient des pages .NET et PHP.
Avec le recul, ça peut paraître évident. Mais j’ai été surpris au premier abord.
Dans l’onglet « Configuration » du site, il suffit de vérifier si les 2 frameworks sont activés :
azure_1
(Désolé, c’est une capture de l’ancien portail Azure, mais je ne peux pas encadrer le nouveau portail avec son UX horrible)
Du côté de Visual Studio, ça se présente ainsi, pas besoin d’installer une extension du genre PHP Tools, il suffit d’ajouter ses fichiers PHP à la solution :
azure_2
Je me suis aperçu de tout cela en implémentant un back-end web-services en C# sur ma vieille appli PHP des années 90. Et ça marche nickel !
NB : Je ne serai pas étonné qu’on puisse également ajouter du JAVA et du Python, afin d’obtenir une application web œcuménique où les langages cohabiteraient en paix.

SharePoint 2013 : How I fixed my corrupted AppFabric Cache Service

sharepoint2013 I have faced some troubles with Ditributed Cache… (again ?)
Especially when I tried to change the service account of the AppFabric Caching service, as explained here.
Then, my services seemed corrupted, it was impossible to restart them properly (Restart-CacheCluster command).
Their status was stuck on STARTING for a few minutes, and then went DOWN :

PS C:Userssp_admin> Use-CacheCluster
PS C:Userssp_admin> Get-CacheHost
HostName : CachePort Service Name Service Status
-------------------- ------------ --------------
Server1:22233 AppFabricCachingService DOWN
Server2:22233 AppFabricCachingService STARTING

And I had this error in the Windows Event logs (Event ID 1000 and 1001) – Seeing a failing KERNELBASE.dll module is not very reassuring !
cache_21
This is what I have done to fix it. BEWARE that a corrupted distributed cache can result in resinstalling SharePoint from scratch ! So please be careful.
1- Stop all the SharePoint Distributed Cache service instances (on each WFE) :

Use-CacheCluster
Stop-SPDistributedCacheServiceInstance -Graceful
Remove-SPDistributedCacheServiceInstance

Use this code to force the uninstall :

Get-SPServiceInstance | ? {($_.service.tostring()) -eq "SPDistributedCacheService Name=AppFabricCachingService"} | % { $_.Server; $_.Status; $_.Id }
$s = Get-SPServiceInstance <GUID>
$s.Delete()

2- Unregister all hosts (on each WFE) :

Unregister-CacheHost

3- Register all hosts :

Register-CacheHost -Provider "SPDistributedCacheClusterProvider" -ConnectionString "Data Source=DBAlias;Initial Catalog=SPServer2013_Config;Integrated Security=True;Enlist=False" -Account "DOMAINSP_DistributedCache" -CachePort 22233 -ClusterPort 22234 -ArbitrationPort 22235 -ReplicationPort 22236 -HostName Server1

  • The parameter « Account » must be the managed account that run the service (as displayed in the central administration).
  • The parameters « Provider » and « ConnectionString » must be copied from the following file « C:Program FilesAppFabric 1.1 for Windows ServerDistributedCacheService.exe.config »
  • The parameter « HostName » must be changed as well.

4- Start each cache host (on each WFE) :

Start-CacheHost -ComputerName Server1 -CachePort 22233

5- Restart all the servers
6- Create the SharePoint Service Instances (on each WFE) :

Add-SPDistributedCacheServiceInstance

Everything went well then. These 2 commands showed me that the services were Online, and the AppFabric Services were marked as UP :

Get-SPServiceInstance | ? {($_.service.tostring()) -eq "SPDistributedCacheService Name=AppFabricCachingService"} | % { $_.Server; $_.Status; $_.Id }
Use-CacheCluster
Get-CacheHost

SharePoint 2013 : Réparer un cluster de cache distribué défectueux

sharepoint2013 Quand on rencontre des difficultés avec le cache distribué de SharePoint, il faut suivre les instructions données sur cette page : Manage the Distributed Cache service in SharePoint Server 2013.
Cependant, on peut se retrouver avec une ferme plutôt têtue qui refuse de créer correctement un cluster de cache, notamment avec des hôtes qui restent en statut « Provisioning » :/
Voici comment j’ai réussi à m’en sortir :
1.Pré-requis
Premièrement, je pars avec des services de mise en cache AppFabric correctement configurés et lancés.
On vérifie cela avec cette commande :

Use-CacheCluster
Get-CacheHost

Si tous les serveurs sont à UP, on peut continuer.
cache1
Sinon, j’ai écris un autre article sur le sauvetage d’une installation AppFabric qui tournait de l’oeil : SharePoint 2013 : How I fixed my corrupted AppFabric Cache Service
2.Etat des services
Avec cette commandes, on vérifie l’état des services de cache distribué :

Get-SPServiceInstance | ? {($_.service.tostring()) -eq "SPDistributedCacheService Name=AppFabricCachingService"}

Mon problème était là : l’un des hôte restait sur « Provisioning », malgré toutes mes manipulations pour détruire et recréer cet hôte.
cache2
Solution : Recréer complètement le cluster.
3.Recréer un cluster de cache distribué
3.1.Supprimer toutes les instances de cache
Passer ces commandes sur tous les hôtes du cluster. On se retrouvera donc avec un cluster vide :

Use-CacheCluster
Stop-SPDistributedCacheServiceInstance -Graceful
Remove-SPDistributedCacheServiceInstance

3.2.Redémarrer les serveurs
Cela peut paraitre un peu brutal, mais dans mon cas c’était indispensable.
3.3.Recréer les instances de service
Sur tous les serveurs qui devront héberger le cluster, passer cette commande :

Add-SPDistributedCacheServiceInstance

4.Vérifications
Passer de nouveau cette commande :

Get-SPServiceInstance | ? {($_.service.tostring()) -eq "SPDistributedCacheService Name=AppFabricCachingService"}

L’ensemble de serveurs devrait être à « Online ».
En passant par l’administration centrale, et aller dans « Paramètres Système » > « Gérer les services sur le serveur ».
Les services de « Cache distribué » doivent être démarré (« Started ») sur tous les serveurs.
cache3
Hourra, les fonctionnalités portées par le cache distribuées marcheront avec grâce et célérité.

[Retour d'expérience] Nantes en Direct pour Android

Logo Nantes en Direct Contrairement à la version pour Windows Phone qui est en XAML (langage natif), Nantes en Direct pour Android est une application HTML.
Avec Android Studio, j’ai créé une application quasi-vide, avec une seule activité qui implémente une WebView.
L’application HTML est quant à elle hébergée sur Azure.
Exigences de développement
« Nantes en Direct » est une application simple : aggréger l’actualité nantaise.
Quand des personnes installent un produit offrant un service simple, elles s’attendent à que ce prédicat s’applique à tout : simplicité de compréhension, d’utilisation (ergonomie) et simplicité d’éxecution (performances).
Au final, mon exigence principale est que l’application doit aussi bien tourner sur un appareil Android bas de gamme qu’un Android performant de dernière génération.
En plus de cela, il faut aussi économiser sur la consommation de données.
Ergonomie
Infographiste, c’est un métier, et ce n’est pas le mien :/ Mais je voulais que Nantes en Direct propose une ergonomie simple et directement compréhensible.
Chaque article est composé de 7 éléments ou informations :

  • Le titre
  • L’origine
  • Le type (fait divers, politique, circulation…)
  • Date de publication
  • Lieu
  • Lien
  • Photo

Pas facile de loger toutes ces informations dans un espace restreint !
Depuis la première version, l’agencement n’a pas trop changé :
Article dans Nantes en Direct
De plus, il y a 3 grandes catégories d’article : Actualité, Sorties et Sport.
Hérité de Windows Phone, j’ai conservé la présentation en pages qui coulissent horizontalement.
Peut-être des expert en ergonomie auraient des remarques à faire, je suis ouvert !
Performances
Déjà pour débugger tout en s’assurer que l’appli fonctionnera sur des appareils pas chers, il faut… acheter un téléphone pourri ! J’ai choisi un Logicom à 50€ à la FNAC, avec une résolution de 480 * 800 et des spécificité au ras des pâquerettes.
Données
Soyons léger ! La liste des articles est générée dans le cloud sur un serveur Azure qui s’occupe de parcourir les sites d’information.
L’application mobile se contente simplement de lire le fichier XML qui en résulte.
What ? XML et pas JSON ?
Et oui, le XML hérite de la version WIndows Phone. Le framework .NET était à l’époque beaucoup à l’aise avec ce format que le jeune et arrogant JSON.
Prochainement je migrerai en JSON, notamment pour économiser encore plus sur la consommation de données.
Design plat et adaptif
Autre légereté : Le peu d’utilisation d’image…. Merci le flat design !
La aussi on gagne sur la conso data.
ned_capture
Combo HTML 5/CSS/jQuery
Enfin le développement web, tout ce qu’il y a de plus classique : HTML/CSS pour mettre en forme tout cela.
jQuery charge les données et adapte la taille des éléments pour être responsive design.
Je n’exclus pas d’utiliser bootstrap dans une version prochaine, histoire d’apporter un peu d’élégance à peu de frais.
Utilisation
Disponible au public depuis 3 mois, l’application a été téléchargée 269 fois, avec un taux de conservation de 77% (personne qui gardent l’application sans la désinstaller.)
On est loin des 2100 de Windows Phone ! Mais j’espère arriver rapidement à 5000 utilisateurs en tout sur Nantes.
Nantes en Direct pour Android
Nantes en Direct pour Windows Phone

SharePoint 2013 : Load balancer could not find the endpoint for… (SPEndpointAddressNotFoundException)

Stupeur et tremblement dans les ULS…
sharepoint2013
This kind of warning can occur with any service application. It means that the application (under IIS) is not running or does not exist !
How can I check ?
When you create a new service application, you should always check that it is actually running under IIS :

  • Get the Service Application ID (SharePoint 2013 Management Shell) :
  • (Get-SPServiceApplication -name "WorkManagementServiceApp").Id
    SPEndpointAddressNotFoundException_Capture_1

  • Launch IIS Manager (inetmgr.exe) , and check if the web application exists under « SharePoint Web Services » :
  • SPEndpointAddressNotFoundException_Capture_2

  • Also check if the associated application pool is running

What Happened ?
If you created your service application with Powershell, there is a chance that it has not been provisioned.
The command « Get-SPServiceApplication » might return something, but there’s no app in IIS ! This article explains it with more details.
See that example that creates a Work Management Service :

# Get the App Pool Account :
$appPoolAccount = Get-SPManagedAccount "DOMAINSPServices"
New-SPServiceApplicationPool -Name "WorkManagementProxyApplicationPool" -Account $appPoolAccount
$appPool = Get-SPServiceApplicationPool "WorkManagementProxyApplicationPool"
# Create the Service Application :
New-SPWorkManagementServiceApplication -Name "WorkManagementService" -ApplicationPool $appPool
$serviceApp = Get-SPServiceApplication -name "WorkManagementService"
# Create Proxy
New-SPWorkManagementServiceApplicationProxy -name "WorkManagementServiceProxy" -ServiceApplication $serviceApp -DefaultProxyGroup

Solution
Is that enough ? No, it isn’t. You should provision it :

$serviceApp.Provision()

A few minutes later, you should see the web application and the application pool runnning in IIS.

Which DLL are used by a process ?

MS-DOS_iconSometimes, you need to move or update a DLL file, but you receive an error message saying : « Access denied ».
It’s not always a file access right problem.
Mayby this library is currently used by a process. To found out which one, just type use the tasklist command in a DOS / Powershell prompt :

tasklist /m your_dll_file.dll

Simple !
Furthermore, if you want to know which regular file (not DLL) is being used by a program, you can download and run process explorer from Windows Sysinternals website. Then « Find > Find Handle or DLL ».

Call a Powershell script from c# code

PowerShell logo This solution given here :
executing-powershell-scripts-from-c is fine, but only works with .NET 4.0 or above…
In my case, I needed to call a powershell script from a c# code source running under .NET 3.5.
So, this is a function that uses a Process objet to run Powershell :

public static int RunPowershellScript(string ps)
{
int errorLevel;
ProcessStartInfo processInfo;
Process process;
processInfo = new ProcessStartInfo("powershell.exe", "-File " + ps);
processInfo.CreateNoWindow = true;
processInfo.UseShellExecute = false;
process = Process.Start(processInfo);
process.WaitForExit();
errorLevel = process.ExitCode;
process.Close();
return errorLevel;
}

This code is synchronous, and has a lack of prerequisites checks, but it can be reusable in a more elegant code 😉

Portage de Nantes en Direct sur Android

Nantes_en_direct_Android
Afin d’avoir une plus grande audience pour l’application « Nantes en Direct », je vais la porter sur Android !
Je pense faire appel à des sponsors pour financer l’exploitation de l’application, et les 500 utilisateurs quotidiens sous Windows Phone ne sont pas suffisants.
C’est le contact avec un commerçant nantais intéressé pour apparaître dans Nantes en Direct qui me pousse à aller plus loin.
Alors je ressors mes abaques HTML5 / CSS / jQuery, et c’est parti 🙂
Nantes en Direct sur le Windows Phone store

How to migrate contacts from Windows Live Mail to Outlook.com

(English translation coming soon !)
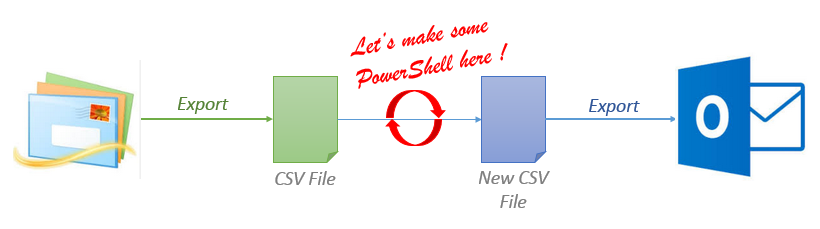
Il semble qu’il y ait un problème d’export / import de contacts de « Windows Live Mail » vers « Outlook.com ».
import_outlook
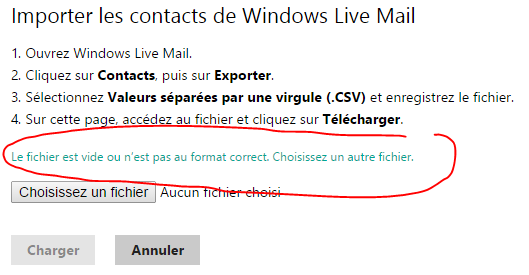
Le format d’export de Windows Live mail (fichier *.CSV) ne semble pas reconnu par Outlook…
Solution : On ne va pas se laisser abattre ! Migrons le format CSV de Windows Live Mail vers le format reconnu par Outlook avec un petit traitement powerShell pour faire cet import :
import_outlook_2
Le script PowerShell peut ressembler à ci-dessous. Tout ce que vous avez à changer est le nom du fichier « windows_live_mail_export_file.csv ». Attention, je récupère les champs les plus utilisés :

#Header line. Every value must be enclosed in double-quotes (that’s not the cas in Windows Live mail export)
$output = "`"Title`",`"First Name`",`"Middle Name`",`"Last Name`",`"Suffix`",`"Given Name Yomi`",`"Family Name Yomi`",`"Home Street`",`"Home City`",`"Home State`",`"Home Postal Code`",`"Home Country`",`"Company`",`"Department`",`"Job Title`",`"Office Location`",`"Business Street`",`"Business City`",`"Business State`",`"Business Postal Code`",`"Business Country`",`"Other Street`",`"Other City`",`"Other State`",`"Other Postal Code`",`"Other Country`",`"Assistant’s Phone`",`"Business Fax`",`"Business Phone`",`"Business Phone 2`",`"Callback`",`"Car Phone`",`"Company Main Phone`",`"Home Fax`",`"Home Phone`",`"Home Phone 2`",`"ISDN`",`"Mobile Phone`",`"Other Fax`",`"Other Phone`",`"Pager`",`"Primary Phone`",`"Radio Phone`",`"TTY/TDD Phone`",`"Telex`",`"Anniversary`",`"Birthday`",`"E-mail Address`",`"E-mail Type`",`"E-mail 2 Address`",`"E-mail 2 Type`",`"E-mail 3 Address`",`"E-mail 3 Type`",`"Notes`",`"Spouse`",`"Web Page`"" + "`r`n"
$output | out-file ".outlook.com_export_file.csv"
# Let’s parse each line of the original export file
Get-Content "windows_live_mail_export_file.csv" | % {
# Values are separated by comas
$infosArray = $_.Split(",")
# Store in variable the wanted values
$FirstName = $infosArray[0]
$Name = $infosArray[1]
$Email = $infosArray[5]
$Street = $infosArray[6]
$Town = $infosArray[7]
$PostalCode = $infosArray[8]
$Country = $infosArray[10]
$HomePhone = $infosArray[11]
$HomePhone2 = $infosArray[12]
$MobilePhone = $infosArray[13]
$WebSite = $infosArray[14]
$Comment = $infosArray[28]
$output = ",`"$FirstName`",,`"$Name`",,,,`"$Street`",`"$Town`",`"$Dpt`",`"$PostalCode`",`"$Country`",,,,,,,,,,,,,,,,,,,,,,,`"$HomePhone`",`"$HomePhone2`",,`"$MobilePhone`",,,,,,,,,,`"$Email`",,,,,,`"$Comment`",,`"$WebSite`""
# Concatenation of new line
Add-Content ".outlook.com_export_file.csv" $output
}

Attention, lors du choix du format de l’import, il faut choisir « Outlook.com » !
import_outlook_3